Nginx
Nginx (engine x) 是一个高性能的HTTP和反向代理服务,也是一个IMAP/POP3/SMTP服务。Nginx是由伊戈尔·赛索耶夫为俄罗斯访问量第二的Rambler.ru站点(俄文:Рамблер)开发的,第一个公开版本0.1.0发布于2004年10月4日。
其将源代码以类BSD许可证的形式发布,因它的稳定性、丰富的功能集、示例配置文件和低系统资源的消耗而闻名。2011年6月1日,nginx 1.0.4发布。
Nginx是一款轻量级的Web 服务器/反向代理服务器及电子邮件(IMAP/POP3)代理服务器,并在一个BSD-like 协议下发行。其特点是占有内存少,并发能力强,事实上nginx的并发能力确实在同类型的网页服务器中表现较好,中国大陆使用nginx网站用户有:百度、京东、新浪、网易、腾讯、淘宝等。
百度百科是这样说的,总而言之nginx就是个Web服务器。那有人就纳闷了,Tomcat也是Web服务器,它俩有什么区别呢?
nginx和tomcat的区别
web上的server都叫web server,但是大家分工也有不同的。
nginx常用做静态内容服务和代理服务器(不是你翻墙那个代理),直面外来请求转发给后面的应用服务(tomcat等),
tomcat更多用来做做一个应用容器,让java web app跑在里面的东西。
反向代理
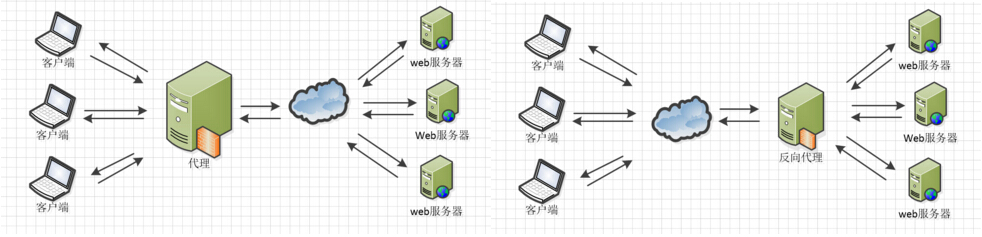
提反向代理之前必须要了解正向代理,用我自己的话总结一下:
- 正向代理: 客户端 告诉 同一内网下的代理服务器 自己要访问哪个外网,代理服务器访问这个外网服务器,把内容存到自己这里,然后把内容返回到客户端。客户端知道要访问的具体服务器地址(也有可能是另一个代理服务器),被访问的服务器并不知道是哪个客户端访问的它。(翻墙就是用的正向代理)
- 反向代理: 代理服务器 接受 因特网(外网)上某个 客户端 的请求,代理服务器按照一定的规则,访问某一个内网服务器,把内容存到自己这里,然后把内容返回到客户端。客户端只知道自己访问了个代理服务器,不知道自己访问的是哪一个具体的服务器。
左边是正向代理,右边是反向代理:
负载均衡
当一台服务器的性能达到极限时,我们可以使用服务器集群来提高网站的整体性能。那么,在服务器集群中,需要有一台服务器充当调度者的角色,用户的所有请求都会首先由它接收,调度者再根据每台服务器的负载情况将请求分配给某一台后端服务器去处理。用我的话说就是请求分发给不同服务器,降低单个服务器的压力。那么在这个过程中,调度者如何合理分配任务,保证所有后端服务器都将性能充分发挥,从而保持服务器集群的整体性能最优,这就是负载均衡问题。
nginx安装
直接照着:百度 安装。
安装完成目录效果:
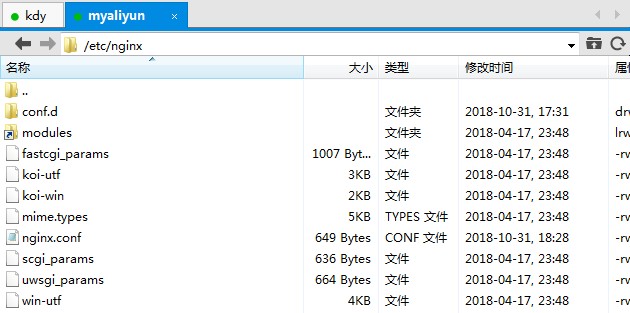
nginx配置文件
默认的配置文件是/etc/nginx/nginx.conf,打开内容如下:
user  nginx;
worker_processes  1;

error_log  /var/log/nginx/error.log warn;
pid        /var/run/nginx.pid;


events {
    worker_connections  1024;
}


http {
    include       /etc/nginx/mime.types;
    default_type  application/octet-stream;

    log_format  main  '$remote_addr - $remote_user [$time_local] "$request" '
                      '$status $body_bytes_sent "$http_referer" '
                      '"$http_user_agent" "$http_x_forwarded_for"';

    access_log  /var/log/nginx/access.log  main;

    sendfile        on;
    #tcp_nopush     on;

    keepalive_timeout  65;

    #gzip  on;


    include /etc/nginx/conf.d/*.conf;
}
发现它还include了/conf.d文件夹下的所有.conf文件,打开这个文件夹发现有一个default.conf配置文件,打开:
server {
    listen       80;
    server_name  localhost;

    #charset koi8-r;
    #access_log  /var/log/nginx/host.access.log  main;

    location / {
        root   /usr/share/nginx/html;
        index  index.html index.htm;
		proxy_pass http://127.0.0.1:8080/;
    }

    #error_page  404              /404.html;

    # redirect server error pages to the static page /50x.html
    #
    error_page   500 502 503 504  /50x.html;
    location = /50x.html {
        root   /usr/share/nginx/html;
    }

    # proxy the PHP scripts to Apache listening on 127.0.0.1:80
    #
    #location ~ \.php$ {
    #    proxy_pass   http://127.0.0.1;
    #}

    # pass the PHP scripts to FastCGI server listening on 127.0.0.1:9000
    #
    #location ~ \.php$ {
    #    root           html;
    #    fastcgi_pass   127.0.0.1:9000;
    #    fastcgi_index  index.php;
    #    fastcgi_param  SCRIPT_FILENAME  /scripts$fastcgi_script_name;
    #    include        fastcgi_params;
    #}

    # deny access to .htaccess files, if Apache's document root
    # concurs with nginx's one
    #
    #location ~ /\.ht {
    #    deny  all;
    #}
}
其中带#都是被注释掉的东西,第一次看不用关注。
nginx配置文件结构
...              #全局块

events {         #events块
   ...
}

http      #http块
{
    ...   #http全局块
    server        #server块
    {
        ...       #server全局块
        location [PATTERN]   #location块
        {
            ...
        }
        location [PATTERN]
        {
            ...
        }
    }
    server
    {
      ...
    }
    ...     #http全局块
}
-
全局块:配置影响nginx全局的指令。一般有运行nginx服务器的用户组,nginx进程pid存放路径,日志存放路径,配置文件引入,允许生成worker process数等。
-
events块:配置影响nginx服务器或与用户的网络连接。有每个进程的最大连接数,选取哪种事件驱动模型处理连接请求,是否允许同时接受多个网路连接,开启多个网络连接序列化等。
-
http块:可以嵌套多个server,配置代理,缓存,日志定义等绝大多数功能和第三方模块的配置。如文件引入,mime-type定义,日志自定义,是否使用sendfile传输文件,连接超时时间,单连接请求数等。
-
server块:配置虚拟主机的相关参数,一个http中可以有多个server。
-
location块:配置请求的路由,以及各种页面的处理情况。
详解
user  nginx;                #配置用户或者组,默认为nobody nobody。
worker_processes  1;        #允许生成的进程数,默认为1

error_log  /var/log/nginx/error.log warn;       #制定日志路径,级别。这个设置可以放入全局块,http块,server块,级别以此为:debug|info|notice|warn|error|crit|alert|emerg
pid        /var/run/nginx.pid;

events {
    worker_connections  1024;                   #最大连接数,默认为512
}

http {
    include       /etc/nginx/mime.types;        #文件扩展名与文件类型映射表
    default_type  application/octet-stream;     #默认文件类型,默认为text/plain

    log_format  main  '$remote_addr - $remote_user [$time_local] "$request" '
                      '$status $body_bytes_sent "$http_referer" '
                      '"$http_user_agent" "$http_x_forwarded_for"';             #自定义格式

    access_log  /var/log/nginx/access.log  main;                                #combined为日志格式的默认值
    sendfile        on;                     #允许sendfile方式传输文件,默认为off,可以在http块,server块,location块。
    #tcp_nopush     on;
    keepalive_timeout  65;                  #连接超时时间,默认为75s,可以在http,server,location块。
    #gzip  on;

    server {
        listen       80;                        #监听的端口号
        server_name  localhost;                 #监听的地址,可以为ip,也可以为解析过的域名

        location / {                                #请求的url过滤,正则匹配,~为区分大小写,~*为不区分大小写。
            root   /usr/share/nginx/html;           #根目录
            index  index.html index.htm;            #设置默认页
    		proxy_pass http://127.0.0.1:8080/;      #请求转向的地址
        }
        error_page   500 502 503 504  /50x.html;    #错误页
        location = /50x.html {
            root   /usr/share/nginx/html;
        }
    }
}
反向代理运行效果
上面写的简单的配置文件,监听默认的80端口,转发到8080端口,而在8080端口,我配置了一个默认Tomcat启动页。访问效果如下:
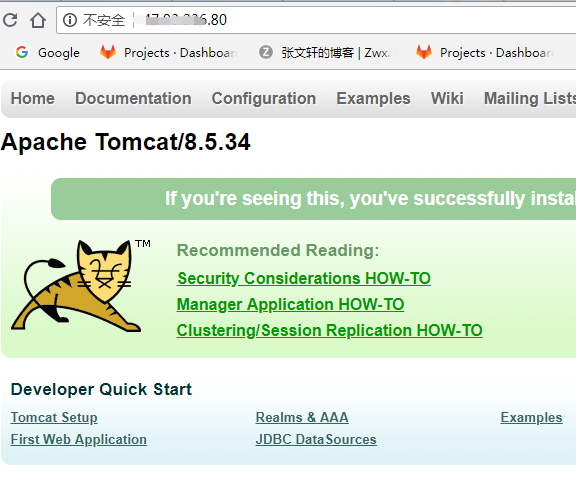 和直接访问8080端口效果一样:
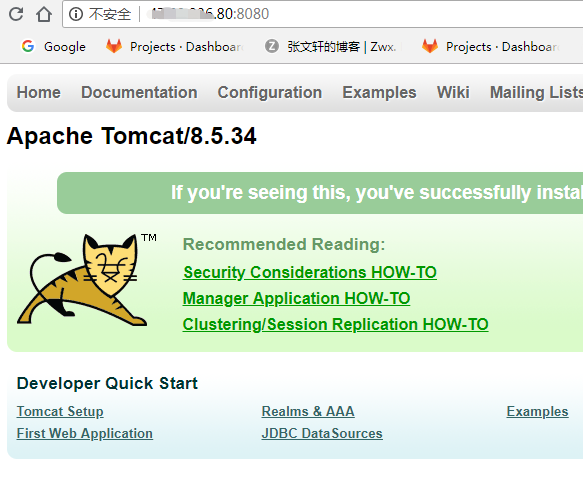
这就是一个简单的反向代理例子。
负载均衡
先看效果,再讲原理:
配置
在.conf文件夹中新建一个配置文件demo.conf,内容如下:
upstream mysvr {
      server xx.xx.xx.80:7080 backup;#热备
      server xx.xx.xx.201:7080 ;
    }

server {
        listen       80;
        server_name  xxx.zwxzzz.top;
        #charset koi8-r;
        #access_log  logs/host.access.log  main;
        location / {
            proxy_pass   http://mysvr;
            index  index.html index.htm;
        }
     }
其中 xx.xx.xx.80:7080和xx.xx.xx.201:7080中运行的是我之前写的相同的springboot项目:
参考:这一篇博客
用到的接口代码如下:
@RestController
public class HelloController {
    @ApiOperation(value = "这是一个作用为Hello的类",notes = "备注说明")
    @RequestMapping(value = "/hello", method= RequestMethod.GET)
    public String hello(int i){
        System.out.println(i);
        return "Hello!!!!"+i;
    }
}
- 我的二级域名xxx.zwxzzz.top是解析到xx.xx.xx.80这台服务器上的,访问这个域名就会把请求转发到这个ip,但是我配置了xx.xx.xx.80:7080的这个Springboot为热备,也就是说只有在另一台服务器上挂了之后请求才会发送到 xx.xx.xx.80:7080端口上,运行查看效果:
效果(双机热备)
发送普通的get请求:


理论上是用的xx.xx.xx.201这台服务器上的接口,去这台服务器的Springboot项目下查看日志:
...
	at java.util.concurrent.ThreadPoolExecutor.runWorker(ThreadPoolExecutor.java:1149) [na:1.8.0_181]
	at java.util.concurrent.ThreadPoolExecutor$Worker.run(ThreadPoolExecutor.java:624) [na:1.8.0_181]
	at org.apache.tomcat.util.threads.TaskThread$WrappingRunnable.run(TaskThread.java:61) [tomcat-embed-core-8.5.34.jar!/:8.5.34]
	at java.lang.Thread.run(Thread.java:748) [na:1.8.0_181]

2018-11-01 18:24:09.951  INFO 21627 --- [nio-7080-exec-5] com.alibaba.druid.pool.DruidDataSource   : {dataSource-1} inited
Thu Nov 01 18:24:10 CST 2018 WARN: Establishing SSL connection without server's identity verification is not recommended. According to MySQL 5.5.45+, 5.6.26+ and 5.7.6+ requirements SSL connection must be established by default if explicit option isn't set. For compliance with existing applications not using SSL the verifyServerCertificate property is set to 'false'. You need either to explicitly disable SSL by setting useSSL=false, or set useSSL=true and provide truststore for server certificate verification.
1
2
3
的确在控制台输出了3次,3次请求全用的xx.xx.xx.201这台服务器。为了保险在看看热备服务器的日志:
...
2018-11-01 18:08:58.118  INFO 16382 --- [           main] s.w.ClassOrApiAnnotationResourceGrouping : Group for method hello was 这是一个hello类
2018-11-01 18:08:58.316  INFO 16382 --- [           main] s.b.c.e.t.TomcatEmbeddedServletContainer : Tomcat started on port(s): 7080 (http)
2018-11-01 18:08:58.325  INFO 16382 --- [           main] com.zwx.demo.DemoApplication             : Started DemoApplication in 11.954 seconds (JVM running for 12.755)
和理想状态一样,啥都没有!
再将主服务器xx.xx.xx.201的项目停止,模拟这个服务器挂了的情况,继续发请求,发现服务并没有挂,正常输出:


现在应该是把请求发送到热备服务器上了,打开xx.xx.xx.80的运行日志:
...
2018-11-01 18:08:58.316  INFO 16382 --- [           main] s.b.c.e.t.TomcatEmbeddedServletContainer : Tomcat started on port(s): 7080 (http)
2018-11-01 18:08:58.325  INFO 16382 --- [           main] com.zwx.demo.DemoApplication             : Started DemoApplication in 11.954 seconds (JVM running for 12.755)
2018-11-01 18:33:00.850  INFO 16382 --- [nio-7080-exec-1] o.a.c.c.C.[Tomcat].[localhost].[/]       : Initializing Spring FrameworkServlet 'dispatcherServlet'
2018-11-01 18:33:00.850  INFO 16382 --- [nio-7080-exec-1] o.s.web.servlet.DispatcherServlet        : FrameworkServlet 'dispatcherServlet': initialization started
2018-11-01 18:33:00.866  INFO 16382 --- [nio-7080-exec-1] o.s.web.servlet.DispatcherServlet        : FrameworkServlet 'dispatcherServlet': initialization completed in 16 ms
2018-11-01 18:33:01.058  INFO 16382 --- [nio-7080-exec-1] com.alibaba.druid.pool.DruidDataSource   : {dataSource-1} inited
Thu Nov 01 18:33:01 CST 2018 WARN: Establishing SSL connection without server's identity verification is not recommended. According to MySQL 5.5.45+, 5.6.26+ and 5.7.6+ requirements SSL connection must be established by default if explicit option isn't set. For compliance with existing applications not using SSL the verifyServerCertificate property is set to 'false'. You need either to explicitly disable SSL by setting useSSL=false, or set useSSL=true and provide truststore for server certificate verification.
4
5
果然输出到这里了!
一个最简单的主从双机热备就配置好了,解决了一台应用服务器挂了整个服务都不可用的情况。这只是负载均衡最简单的一种情况。但是这样也有风险:如果 配置nginx的代理服务器挂了,而两台应用服务器正常的话,整个应用也就挂了。 这明显不符合实际的生产场景啊,当然也有解决方法:DNS解析到多台代理服务器的ip,每台代理服务器nginx配置相同的内容,这样就完成了代理服务器的DNS轮询和应用服务器的负载均衡,实现了一个高可用性的系统架构(这里先不考虑多数据库),当然实际架构肯定比这里写的复杂得多,希望我在以后的工作中可以遇到。
不同场景下的负载均衡配置:
- 热备:如果你有2台服务器,当一台服务器发生事故时,才启用第二台服务器给提供服务。服务器处理请求的顺序:AAAAAA突然A挂啦,BBBBBBBBBBBBBB…..
upstream mysvr { server xx.xx.xx.80:7080; server xx.xx.xx.201:7080 backup; #热备 } - 轮询:nginx默认就是轮询其权重都默认为1,服务器处理请求的顺序:ABABABABAB….
upstream mysvr { server xx.xx.xx.80:7080; server xx.xx.xx.201:7080; } - 加权轮询:跟据配置的权重的大小而分发给不同服务器不同数量的请求。如果不设置,则默认为1。下面服务器的请求顺序为:ABBABBABBABBABB….
upstream mysvr { server xx.xx.xx.80:7080 weight=1; server xx.xx.xx.201:7080 weight=2; } - ip_hash:nginx会让相同的客户端ip请求相同的服务器。
upstream mysvr {
    server xx.xx.xx.80:7080 weight=1;
    server xx.xx.xx.201:7080 weight=2;
    ip_hash;
  }
关于nginx几个状态参数讲解。
down,表示当前的server暂时不参与负载均衡。
backup,预留的备份机器。当其他所有的非backup机器出现故障或者忙的时候,才会请求backup机器,因此这台机器的压力最轻。
max_fails,允许请求失败的次数,默认为1。当超过最大次数时,返回proxy_next_upstream 模块定义的错误。
fail_timeout,在经历了max_fails次失败后,暂停服务的时间。max_fails可以和fail_timeout一起使用。
- 例子:
upstream mysvr {
    server xx.xx.xx.80:7080 weight=2 max_fails=2 fail_timeout=2;
    server xx.xx.xx.201:7080 weight=1 max_fails=2 fail_timeout=1;
  }
实际效果:
上面已经展示了双机热备的实际效果,接下来展示一下轮询、加权轮询、和ip_hash的效果:
轮询
修改完配置文件后向test.zwxzzz.top发送10次请求,参数分别为10~19:
 查看日志参数:
- .80服务器:
...
Fri Nov 02 15:03:39 CST 2018 WARN: Establishing SSL connection without server's identity verification is not recommended. According to MySQL 5.5.45+, 5.6.26+ and 5.7.6+ requirements SSL connection must be established by default if explicit option isn't set. For compliance with existing applications not using SSL the verifyServerCertificate property is set to 'false'. You need either to explicitly disable SSL by setting useSSL=false, or set useSSL=true and provide truststore for server certificate verification.
10
11
12
13
14
15
16
17
18
19
。。。。。。???
原来是我昨天把.201服务器的项目关了忘记重新打开了,打开之后再发10次请求: .80服务器日志:
11
13
15
17
19
.201服务器日志:
Fri Nov 02 15:18:54 CST 2018 WARN: Establishing SSL connection without server's identity verification is not recommended. According to MySQL 5.5.45+, 5.6.26+ and 5.7.6+ requirements SSL connection must be established by default if explicit option isn't set. For compliance with existing applications not using SSL the verifyServerCertificate property is set to 'false'. You need either to explicitly disable SSL by setting useSSL=false, or set useSSL=true and provide truststore for server certificate verification.
10
12
14
16
18
实现了服务器的轮询。
加权轮询
- .80服务器
... 2018-11-02 15:33:32.318 INFO 23684 --- [nio-7080-exec-1] com.alibaba.druid.pool.DruidDataSource : {dataSource-1} inited Fri Nov 02 15:33:32 CST 2018 WARN: Establishing SSL connection without server's identity verification is not recommended. According to MySQL 5.5.45+, 5.6.26+ and 5.7.6+ requirements SSL connection must be established by default if explicit option isn't set. For compliance with existing applications not using SSL the verifyServerCertificate property is set to 'false'. You need either to explicitly disable SSL by setting useSSL=false, or set useSSL=true and provide truststore for server certificate verification. 21 24 27 - .201服务器
...
2018-11-02 15:33:28.185  INFO 14143 --- [nio-7080-exec-1] com.alibaba.druid.pool.DruidDataSource   : {dataSource-1} inited
Fri Nov 02 15:33:28 CST 2018 WARN: Establishing SSL connection without server's identity verification is not recommended. According to MySQL 5.5.45+, 5.6.26+ and 5.7.6+ requirements SSL connection must be established by default if explicit option isn't set. For compliance with existing applications not using SSL the verifyServerCertificate property is set to 'false'. You need either to explicitly disable SSL by setting useSSL=false, or set useSSL=true and provide truststore for server certificate verification.
20
22
23
25
26
28
29
ip_hash
为了保证ip不同,我先用手机发送3次请求,参数为30.31.22

再用电脑的postman发送3次请求,参数为40、41、42
查看日志:
- .80服务器:
Fri Nov 02 15:33:32 CST 2018 WARN: Establishing SSL connection without server's identity verification is not recommended. According to MySQL 5.5.45+, 5.6.26+ and 5.7.6+ requirements SSL connection must be established by default if explicit option isn't set. For compliance with existing applications not using SSL the verifyServerCertificate property is set to 'false'. You need either to explicitly disable SSL by setting useSSL=false, or set useSSL=true and provide truststore for server certificate verification.
21
24
27
40
41
42
- .201服务器:
Fri Nov 02 15:33:28 CST 2018 WARN: Establishing SSL connection without server's identity verification is not recommended. According to MySQL 5.5.45+, 5.6.26+ and 5.7.6+ requirements SSL connection must be established by default if explicit option isn't set. For compliance with existing applications not using SSL the verifyServerCertificate property is set to 'false'. You need either to explicitly disable SSL by setting useSSL=false, or set useSSL=true and provide truststore for server certificate verification.
20
22
23
25
26
28
29
30
31
32
模拟完成!!!!
后记
使用的机器:一台是我自己的阿里云学生机,另一台是我同学的腾讯云学生机。
 特别鸣谢:腾讯云服务器提供者KDY.
参考资料: